Are you ready to harness the power of the sun and take a step towards energy independence? Building your own small-scale solar power system might sound daunting, but with this comprehensive, step-by-step guide, you’ll be well on your way to generating your own clean energy. We’ll cover everything from safety to sourcing materials and the tools you’ll need.
Why Go DIY Solar?
Going DIY with solar panels offers numerous benefits:
- Cost Savings: While there’s an initial investment, building your own system can be significantly cheaper than professional installation, especially for smaller setups.
- Learning Experience: You’ll gain a deep understanding of renewable energy and electrical systems.
- Customization: You can tailor the system precisely to your specific needs and energy consumption.
Sustainability: Contribute to a greener planet by reducing your carbon footprint.
Safety First!
Before we dive into the nitty-gritty, let’s talk about safety. Working with electricity can be dangerous if proper precautions aren’t taken.
- Always Disconnect Power: When working on any part of your electrical system, ensure the power is disconnected at the source.
- Wear Protective Gear: Gloves, safety glasses, and insulated tools are your best friends.
- Understand Your System: Never work on a component you don’t fully understand. Research and ask for help if needed.
- Water and Electricity Don’t Mix: Ensure your workspace is dry, especially when working with outdoor components.
Fire Extinguisher: Keep a fire extinguisher suitable for electrical fires nearby.
What You’ll Need: Tools & Materials
Here’s a list of essential tools and materials for your DIY solar panel system. This list can vary depending on the size and complexity of your system, so consider it a starting point.
Essential Tools:
- Multimeter: Absolutely crucial for testing voltage, current, and continuity.
- Wire Strippers & Crimpers: For preparing and connecting wires.
- Screwdrivers & Wrenches: Various sizes for assembly.
- Drill: For mounting panels and other components.
- Tape Measure: For accurate placement.
- Level: To ensure your panels are installed correctly.
- Soldering Iron (optional but recommended): For more secure electrical connections, especially for custom panel builds.
- Safety Gear: Gloves, safety glasses, and insulated tools.
Key Materials:
- Solar Panels (PV Modules):
- Monocrystalline or Polycrystalline: Monocrystalline are generally more efficient but pricier, while polycrystalline are more budget-friendly. For a small-scale system, either can work well.
- Wattage: Determine your energy needs to choose appropriate panel wattage.
- Quantity: Based on your desired output.
- Charge Controller:
- MPPT (Maximum Power Point Tracking) or PWM (Pulse Width Modulation): MPPT controllers are more efficient, especially for larger systems, as they can extract more power from your panels. PWM controllers are simpler and more affordable for very small setups.
- Voltage & Amperage: Must match your panel and battery bank specifications.
- Inverter (if powering AC appliances):
- Pure Sine Wave or Modified Sine Wave: Pure sine wave inverters produce cleaner power, suitable for all electronics. Modified sine wave inverters are cheaper but can cause issues with sensitive electronics.
- Wattage: Must be able to handle the total wattage of all AC appliances you intend to power simultaneously.
- Batteries (for energy storage):
- Deep Cycle Batteries: These are designed for regular, deep discharges. Lead-acid (flooded, AGM, Gel) or Lithium-ion (LiFePO4) are common choices. LiFePO4 batteries are more expensive upfront but offer longer lifespan and better performance.
- Voltage & Ah (Ampere-hours): Determine your storage capacity based on your energy consumption and desired autonomy.
- Wiring & Connectors:
- Solar PV Cable (UV resistant): Specific cables designed for solar applications.
- MC4 Connectors: Standard connectors for solar panels.
- Battery Cables: Thick gauge cables for connecting batteries to the charge controller and inverter.
- Fuses & Circuit Breakers: Essential for protecting your system from overcurrents.
- Mounting System:
- Roof Mount, Ground Mount, or Pole Mount: Choose based on your location and preferences.
- Racking & Brackets: To securely hold your panels.
Conduit & Junction Boxes: For protecting wiring and making safe connections.
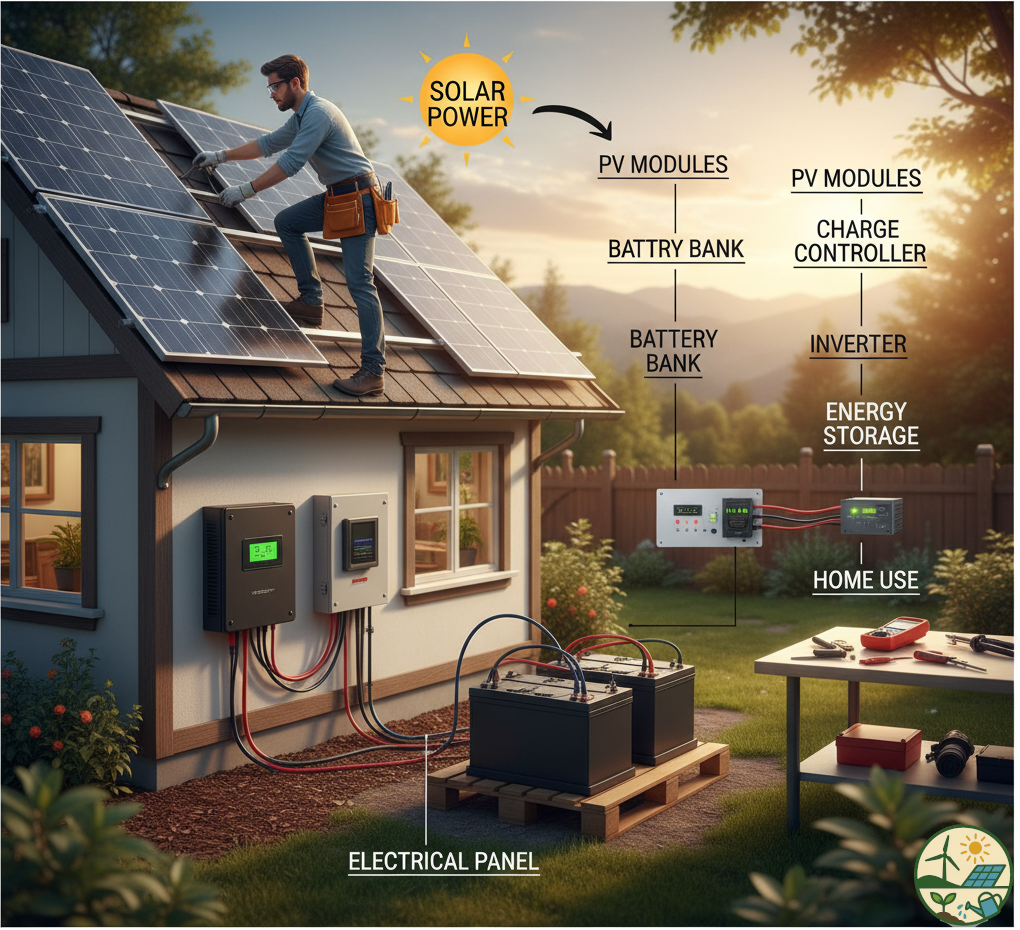
Step-by-Step Tutorial: Building Your System
Step 1: Design Your System
Before buying anything, plan your system. Calculate your energy needs (watt-hours per day) to determine the size of your solar panels and battery bank. Consider future expansion.
Step 2: Install Mounting Hardware
Securely attach your chosen mounting system (roof, ground, or pole) according to manufacturer instructions. Ensure it’s angled optimally for sunlight exposure throughout the year.
Step 3: Mount Your Solar Panels
Carefully attach the solar panels to the mounting hardware. Connect the panels in series or parallel, depending on your system voltage requirements. Always connect panels with the power disconnected.
Step 4: Wire Your Charge Controller
Connect the solar panel output to the “PV input” terminals on your charge controller. Follow the polarity (+ to +, – to -).
Step 5: Connect Your Battery Bank
Connect your deep cycle batteries in series or parallel to achieve your desired voltage and capacity. Connect the battery bank to the “battery terminals” on your charge controller. Ensure correct polarity.
It’s crucial to connect the batteries to the charge controller BEFORE connecting the solar panels to prevent damage.
Step 6: Install the Inverter (if using AC power)
Connect the inverter to the “load” or “battery” terminals of your charge controller (or directly to the battery bank, depending on your inverter and system design). Ensure appropriate fuses or circuit breakers are in place.
Step 7: Ground Your System
Proper grounding is essential for safety. Consult local electrical codes for grounding requirements and ensure all metal components are properly grounded.
Step 8: Test and Monitor
Once everything is connected, double-check all your wiring. Use your multimeter to test voltage and current at various points in the system. Gradually turn on your system and monitor its performance.
Going Further
This guide provides the foundation for building a small-scale DIY solar power system. As you become more confident, you can explore:
- Larger Systems: Scaling up your system to power more of your home.
- Grid-Tied Systems: Connecting your solar system to the utility grid.
- Advanced Monitoring: Using smart devices to track your energy production and consumption.
Building your own solar system is a rewarding project that empowers you with sustainable energy. Always prioritize safety, take your time, and enjoy the journey towards a brighter, greener future!